Android 版本
Android 版本列表
| Android 版本 | API Level | 名称 | 首次发布日期 |
|---|---|---|---|
| Android 11 | 30 | - | 2020-02-19 |
| Android 10 | 29 | - | 2019-09-03 |
| 9.0 | 28 | Pie | 2018-08-06 |
| 8.1 | 27 | Oreo | 2017-12-05 |
| 8.0 | 26 | Oreo | 2017-08-21 |
| 7.1、7.1.1、7.1.2 | 25 | Nougat | 2016-10-04 |
| 7.0 | 24 | Nougat | 2016-08-22 |
| 6.0、6.0.1 | 23 | Marshmallow | 2015-10-05 |
| 5.1、5.1.1 | 22 | Lollipop | 2015-03-09 |
| 5.0、5.0.1、5.0.2 | 21 | Lollipop | 2014-11-12 |
| 4.4W、4.4W.1、4.4W.2 | 20 | KitKat, with wearable extensions | 2014-06-25 |
| 4.4、4.4.1、4.4.2、4.4.3、4.4.4 | 19 | KitKat | 2013-10-31 |
| 4.3、4.3.1 | 18 | Jelly Bean | 2013-07-24 |
| 4.2、4.2.1、4.2.2 | 17 | Jelly Bean | 2012-11-13 |
| 4.1、4.1.1、4.1.2 | 16 | Jelly Bean | 2012-07-09 |
| 4.0.3、4.0.4 | 15 | Ice Cream Sandwich | 2011-12-16 |
| 4.0、4.0.1、4.0.2 | 14 | Ice Cream Sandwich | 2011-10-18 |
| 3.2、3.2.1、3.2.2、3.2.3、3.2.4、3.2.5、3.2.6 | 13 | Honeycomb | 2011-07-15 |
| 3.1 | 12 | Honeycomb | 2011-03-10 |
| 3.0 | 11 | Honeycomb | 2011-02-22 |
| 2.3.3、2.3.4、2.3.5、2.3.6、2.3.7 | 10 | Gingerbread | 2011-02-09 |
| 2.3、2.3.1、2.3.2 | 9 | Gingerbread | 2010-12-06 |
| 2.2、2.2.1、2.2.2、2.2.3 | 8 | Froyo | 2010-05-20 |
| 2.1 | 7 | Eclair | 2010-01-12 |
| 2.0.1 | 6 | Eclair | 2009-12-03 |
| 2.0 | 5 | Eclair | 2009-10-26 |
| 1.6 | 4 | Donut | 2009-09-15 |
| 1.5 | 3 | Cupcake | 2009-04-27 |
| 1.1 | 2 | Petit Four | 2009-02-09 |
| 1.0 | 1 | - | 2008-09-23 |
// 通过该接口获取版本号
Build.VERSION.SDK_INT
APP的生命周期
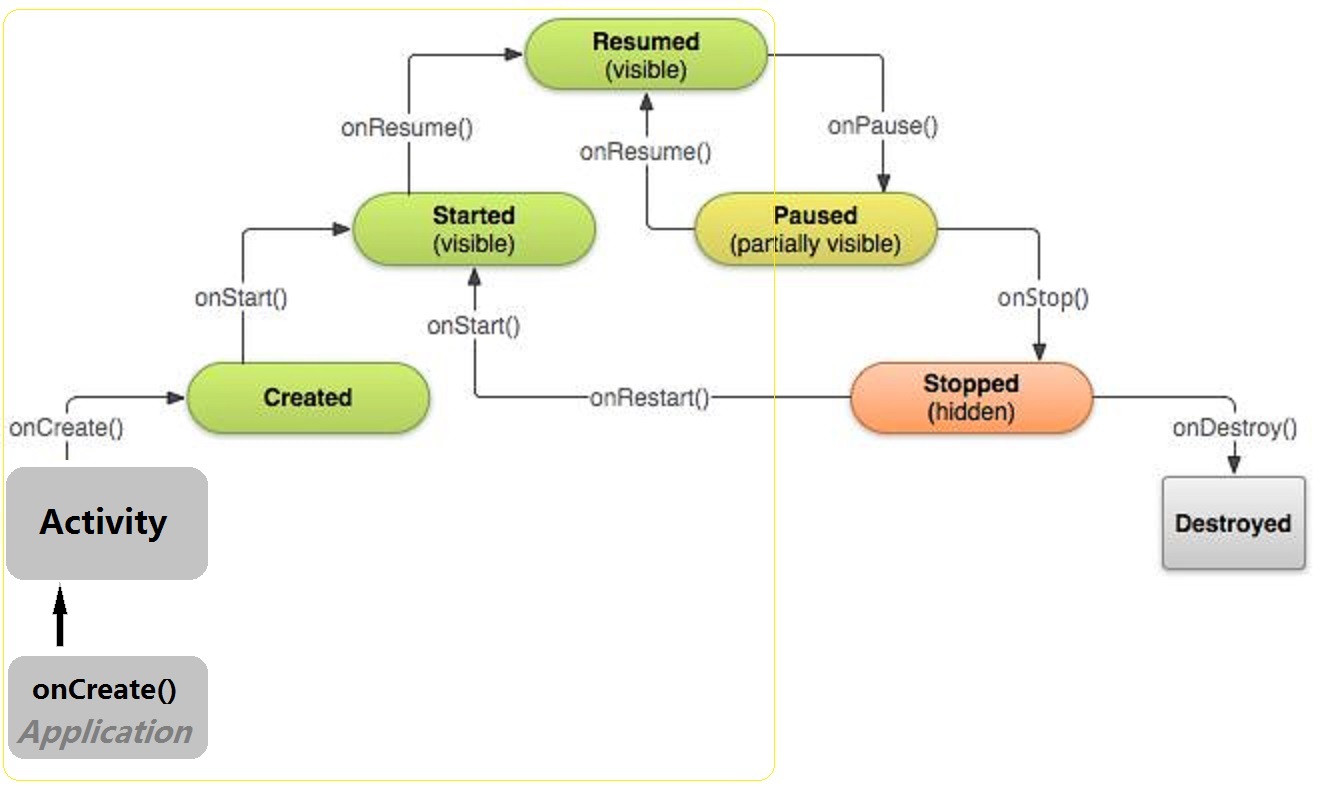
Application
Android 系统会自动在每个程序运行时创建一个Application类的对象,且只创建一个,所以是一个单例。其onCreate回调最先被执行,因此,自定义Application通常用于初始化环境、共享全局数据、处理全局缓存。可在其他组件中,通过getApplication方法获取全局唯一的Application对象。
自定义类继承自Application
public class MyApplication extends Application {

    @Override
    public void onCreate() {
        super.onCreate();
    }
}
在AndroidManifest.xml中配置自定义的MyApplication,通过android:name=".MyApplication"指定
<application
    android:name=".MyApplication"
    android:icon="@mipmap/ic_launcher"
    android:label="@string/app_name"
    android:roundIcon="@mipmap/ic_launcher_round"
    android:supportsRtl="true"
    android:allowBackup="true"
    android:theme="@style/AppTheme">
Activity
onLowMemory:系统在内存不足时回调,可以用来释放一些内存资源(最后一个后台进程被杀时调用)onConfigurationChanged:在配置改变时回调,例如从竖屏变成横屏onNewIntent:Activity被复用时的回调onActivityResult:获取Activity的返回结果,需要与startActivityForResult配套使用
参数解析
startActivityForResult (Intent intent,int requestCode):以接收返回值的方式启动Activity
requestCode:为自定义的请求码,需大于等于 0
setResult (int resultCode,Intent data):在被启动的Activity中设置返回值
resultCode:自定义的结果码,返回给启动它的Activity
onActivityResult (int requestCode, int resultCode, Intent data):接收被启动的Activity在退出时的返回结果
requestCode:启动时设置的请求码resultCode:返回的结果码data:返回的数据
需要注意,Activity类中,默认为我们定义了两个结果码,不够用时,请自定义结果码。
    /** Standard activity result: operation canceled. */
    public static final int RESULT_CANCELED    = 0;
    /** Standard activity result: operation succeeded. */
    public static final int RESULT_OK           = -1;
获取设备ID
由于Android是及其碎片化的,因此安卓上并没有统一的可靠的获取设备唯一ID的方法!总的来说,有如下几种方式
通过设备串号 (IMEI/MEID)
这种方式存在几个缺陷:
- 某些国产“山寨机”上可能会返回
null或者脏数据(0000之类的),平板等不支持运营商的设备也没有串号 - 需要一个动态权限
READ_PHONE_STATE。这是一个非常敏感的通话权限,如果仅为了获取一个设备ID就申请该权限,用户可能认为这是一个流氓软件 - 串号可以被软件擦写,模拟器更是可以随意改写,因此唯一性并不绝对可靠
- 一个双卡手机不止一个
IMEI值,全网通双卡手机更是有两个IMEI和一个MEID - Andorid10不允许获取IMEI
public static String getIMEI(Context context) { if (Build.VERSION.SDK_INT >= Build.VERSION_CODES.Q) { return null; } try { TelephonyManager telephonyManager = (TelephonyManager) context.getSystemService(Context.TELEPHONY_SERVICE); if (telephonyManager == null) { return null; } String imei = telephonyManager.getDeviceId(); if (imei != null && !imei.startsWith("0000")){ return imei; } return null; } catch (Exception e) { return null; } }- 某些国产“山寨机”上可能会返回
使用MAC地址
可以选用蓝牙设备或者WIFI网卡的MAC地址作为唯一设备ID,这两种方式也存在一定缺陷:
- 平板或者其他一些设备可能并不一定具有这两种硬件
- WIFI的MAC地址也可以被软件修改
- 需要申请
ACCESS_WIFI_STATE或者BLUETOOTH权限,不过这两个权限是普通权限,不是敏感的动态权限
public static String getMacAddr (Context context) {
    // 获取wifi的mac地址
    WifiManager wifi = (WifiManager) context.getSystemService(Context.WIFI_SERVICE);
    WifiInfo info = wifi.getConnectionInfo();
    return info.getMacAddress();
}
获取ANDROID_ID
在设备首次启动时,系统会随机生成一个64位的数字,并把这个数字以16进制字符串的形式保存下来,这个16进制的字符串就是
ANDROID_ID。这种方式也存在一定缺陷:- 不同的设备可能会产生相同的
ANDROID_ID - 部分设备会返回null值
- 恢复了出厂设置就会改变
String androidID = Settings.System.getString(getContentResolver(), Settings.System.ANDROID_ID);- 不同的设备可能会产生相同的
推荐做法:
- 生成一个UUID,得到一个同一时空中的唯一码
- 将这个UUID写入一个文件中保存(存放于手机的内置储存器(内置SD)中,即公共空间)
- 存放于公共空间中的文件,在APP卸载后不会被删除
工程结构
项目结构 请查看 项目管理官方文档

drawable和mipmap区别:
- 都可以用来放图片资源
mipmap通常用来放启动图标drawable更加适合放具有固定尺寸的图片资源- 如果需要变大变小的,有动画的资源,放在
mipmap中能有加快渲染速度
其他功能
通知
Android 通知有两种,默认通知和自定义通知。
默认通知不存在样式适配的问题,因为默认通知的布局、颜色、背景都是系统的,总能正确显示通知。
    private static final int NOTIFY_ID = 1;
    private int count = 1;

    public void showNotification(){
        NotificationManager notificationManager = (NotificationManager) getSystemService(Context.NOTIFICATION_SERVICE);

        String chanId = "channel_test";

        if (Build.VERSION.SDK_INT >= Build.VERSION_CODES.O) {
            String channelName = "测试";
            NotificationChannel notificationChannel =
                    new NotificationChannel(chanId, channelName, NotificationManager.IMPORTANCE_DEFAULT);
            notificationManager.createNotificationChannel(notificationChannel);
        }

        NotificationCompat.Builder builder = new NotificationCompat.Builder(this,chanId);
        builder.setSmallIcon(R.drawable.red2);
        builder.setLargeIcon(BitmapFactory.decodeResource(getResources(),R.drawable.red_bag));
        builder.setContentTitle("新消息");
        builder.setContentText("你有一条新消息!   +"+(count++));
        builder.setWhen(System.currentTimeMillis() - 1000*60*60);

        // 设置点击后取消通知
        builder.setAutoCancel(true);
        Intent intent = new Intent(this,MainActivity.class);
        PendingIntent pIntent = PendingIntent.getActivity(this, 0, intent, PendingIntent.FLAG_UPDATE_CURRENT);
        builder.setContentIntent(pIntent);
        Notification notification = builder.build();
        notificationManager.notify(NOTIFY_ID,notification);
    }
自定义通知栏则需要样式适配。通常有两种处理方式,一种是通过读取系统的通知栏样式文件,获取到title和content
的颜色,进而将这个颜色设置到自定义通知上。另一种最简单,直接为自定义通知设置固定的背景色。
// 增加两行代码,设置自定义通知栏
RemoteViews remoteViews = new RemoteViews(mContext.getPackageName(), R.layout.notification_bar_big);
builder.setContent(remoteViews);
未适配的自定义通知栏
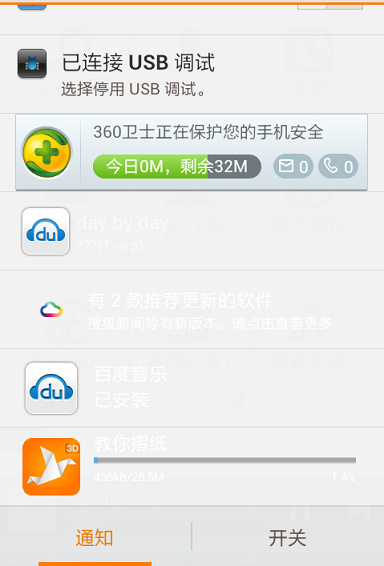
Toast
默认位置的Toast
Toast.makeText(this, "我是 Toast 消息通知", Toast.LENGTH_LONG).show();
指定位置的Toast
Toast toast = Toast.makeText(this, "居中位置的Toast", Toast.LENGTH_LONG);
toast.setGravity(Gravity.CENTER, 0, 0);
toast.show();
公众号“编程之路从0到1”